Menu

Magento is a fully customisable ecommerce platform. It is ideal if you are a medium to large scale enterprise looking for complete control of your data and your site’s design. In this article, we’ll show you how to download and install Magento. Please note however, Magento has two versions – Commerce and Open Source. This tutorial is based on the free to download version, Magento Open Source. We advise downloading it to see if the full version, Magento Commerce, is right for you.

Magento 2 Installation Steps

1. What You’ll Need

Before you begin, please ensure that:

  1. Your system meets the requirements set out in: Magento System Requirements
  2. You have completed all the tasks set out here: Prerequisites
  3. You have set pre-installation ownership and permissions: File System Owner Overview

After completing these steps, you can download here.

Here you will find the latest versions of Magento 2.3 in the following files types: .zip, .gz and .bz2.

After selecting the relevant file type for your operating system, you will see there are two types of package to download – with and without sample data:

  • Magento without sample data – this is an empty Magento installation with default theme but without any products.
  • Magento with sample data – this is a Magento installation populated with sample products and articles. Ideal for quickly setting up a demo site without importing your own inventory.

2. Uploading the File Archive to Your Server

To transfer the Magento software archive to your server:

  1. Install and configure a file transfer protocol (FTP) or secure copy protocol (SCP) client to transfer the Magento software from your computer to your server. There are several ways to configure FTP and SCP.
  2. If you are using shared hosting, you can use unzip/extract feature to extract the Magento package.
  3. If you are running on your server, follow the prompts on your screen or consult the documentation provided with your FTP software for more information.
  4. After you log in to your server, locate the Magento Open Source or Magento Commerce archive on your local system. On the remote system, browse to locate the web server docroot directory.The following figure shows an example.
  5. Transfer the archive from your local system to the web server docroot directory. On some FTP client software, you can do this by dragging and dropping.
  6. Wait while the transfer completes.
  7. Log in to your Magento server, or switch to, the Magento file system owner
  8. Change to the web server docroot or the virtual host directory.
  9. Create a subdirectory for the Magento software.If you set up a virtual host, the subdirectory name must match the name in your virtual host.For example,
mkdir magento2ce
mkdir magento2ee

You can also use a generic directory name

mkdir magento2

10. Copy the Magento archive to that directory.For example

cd /var/www/Magento-CE-2.0.0.tar.bz2 magento2

11. Continue with the next section.

3.Installation

At this point, you can choose whether to setup the software via the command line or the Setup Wizard.

  • Setup Wizard is better for less experienced users or anyone who has a hosting provider (especially if you don’t have access to the Magento server)
  • Command line gives you more control but requires more experience and access to the Magento server

Although the Setup Wizard is easier overall, the only downside is, if anything goes wrong during the installation (e.g. if one module conflicts with another) you will have to start the installation from scratch. By using the Command Line, on the other hand, any component that doesn’t install properly will be flagged up immediately, giving you the option to resolve the issue immediately.

4.Install the Magento software from the command line

The install command uses the following format:

magento setup:install --<option>=<value> ... --<option>=<value>


The following tables describe the installation option names and values. For example installation commands. see Sample localhost installations.

Any options that contain spaces or special characters must be enclosed in either single or double quotes.

Example 1—Basic installation with admin user account

The following example installs Magento with the following options:

  • The Magento software is installed in the magento2 directory relative to the web server docroot on localhost and the path to the Magento Admin is admin; therefore:Your storefront URL is http://127.0.0.1
  • The database server is on the same host as the web server.The database name is magento, and the username and password are both magento
  • Uses server rewrites
  • The Magento administrator has the following properties:
    • First and last name are Magento User
    • Username is admin and the password is admin123
    • E-mail address is user@example.com
  • Default language is en_US (U.S. English)
  • Default currency is U.S. dollars
  • Default time zone is U.S. Central (America/Chicago

Messages similar to the following display to indicate a successful installation:

Post installation file permissions check...
For security, remove write permissions from these directories: '/var/www/html/magento2/app/etc'
[Progress: 274 / 274]
[SUCCESS]: Magento installation complete.
[SUCCESS]: Admin Panel URI: /admin_puu71q

Example 2— Basic install without admin user account

In Magento Commerce version 2.2.8 and later, you have the option to install Magento without creating the Magento administrator user as shown in the following example.

magento setup:install –base-url=http://127.0.0.1/magento2/ \

–db-host=localhost –db-name=magento –db-user=magento –db-password=magento \

–language=en_US –currency=USD –timezone=America/Chicago –use-rewrites=1

Messages like the following display if the installation is successful:

Post installation file permissions check...
For security, remove write permissions from these directories: '/var/www/html/magento2/app/etc'
[Progress: 274 / 274]
[SUCCESS]: Magento installation complete.
[SUCCESS]: Admin Panel URI: /admin_puu71q

After installation you can create an admin user using the admin:user:create command: Create or edit an administrator

Example 3—Install with additional options

The following example installs Magento with the following options:

  • The Magento software is installed in the magento2 directory relative to the web server docroot on localhost and the path to the Magento Admin is admin; therefore:Your storefront URL is http://127.0.0.1
  • The database server is on the same host as the web server.The database name is magento, and the username and password are both magento
  • The Magento administrator has the following properties:
    • First and last name are Magento User
    • Username is admin and the password is admin123
    • E-mail address is user@example.com
  • Default language is en_US (U.S. English)
  • Default currency is U.S. dollars
  • Default time zone is U.S. Central (America/Chicago)
  • The installer first cleans up the database before installing the tables and schema
  • You use a sales order increment prefix ORD$ and because it contains a special character ($), the value must be enclosed in double quotes
  • Session data is saved in the database
  • Uses server rewrites

You must enter the command either on a single line or, as in the preceding example, with a \character at the end of each line.

Messages like the following display if the installation is successful:

Post installation file permissions check...
For security, remove write permissions from these directories: '/var/www/html/magento2/app/etc'
[Progress: 274 / 274]
[SUCCESS]: Magento installation complete.
[SUCCESS]: Admin Panel URI: /admin_puu71q

5. Install via Setup Wizard

The web Setup Wizard is a multi-page interface that enables you to go back and forward one page at a time. You cannot skip pages, and you must enter all required information on every page before you can proceed to the next page.

In the event of errors, you can run the installer again or you can return to a previous page to fix errors on that page.

Getting Started

To install the Magento software using the Setup Wizard:

  1. Start a web browser.
  2. Enter the following URL in the browser’s address or location bar:
http://<Magento host or IP>/<path to Magento root>/setup

For example, if the Magento server’s IP address is 192.0.2.10 and you installed Magento 2 in the magento2/ directory relative to the web server’s docroot, and you did not configure a Virtual Host, enter:

http://<Magento host or IP>/<path to Magento root>/setup

3. On the initial page, click Agree and Set Up Magento.

4. Continue with the following topics in the order presented to complete the installation.

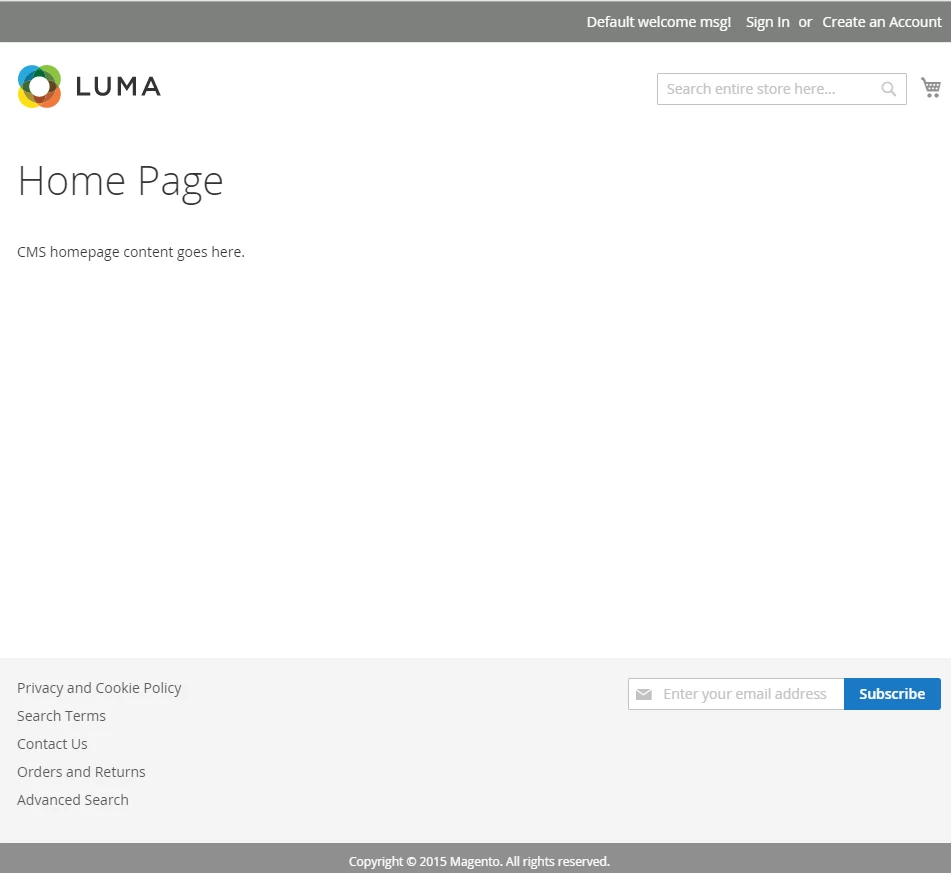
Step 7. Verify the Installation

Assuming you installed the sample data package, you can now verify the installation by checking to see whether the Luma theme (Magento’s default storefront) shows up in the front end.

If it displays as follows, your copy of Magento has installed successfully.

Alternatively, if you did not install the sample data, your storefront should look like this:

Final Checks

If, for whatever reason, your copy of Magento hasn’t installed correctly, there is plenty of additional help at hand.

If you have a general questions you can post a query on the Magento support forums. If your question is more specific and technical, you can also ask for help over at the Stack Exchange. You can also shout out to your fellow Magento users on Twitter.

Need Any Help ? See our Magento 2 Migration Page for Advice

Want to Check out our Credentials? See our full list of services here

Further reading

Leave a Reply

Your email address will not be published. Required fields are marked *